INSTALLING DEBIAN 12.1.0 AND
VIRTUALBOX GUEST ADDITIONS STEP BY STEP
1- INSTALLATING DEBIAN 12.1.0
0- Before starting: Check that you are working with VirtualBox
6.1.38 (or higher) and VirtualBox 6.1.38 Oracle VM VirtualBox
Extension Pack (or higher).
1- Download the installation image of Debian 12.1.0
called debian-12.1.0-amd64-DVD-1.iso from this
link (you can find the image at the bottom).
2- Create a
new virtual machine with te following specifications:
- Name and operating system:
- Name: daw2m07uf1
- Type: Linux
- Version: Debian (64-bit)
- Memory
size:
- Hard Disk:
- Select --> Create a
virtual hard disk now
- Hard disk file type:
- Select --> VDI (VirtualBox
Disk Image)
- Storage on physical hard disk:
- Select --> Dynamically
allocated
- File Location and size:
- Size of the virtual hard disk: 20GB
3- Additional configuration parameters:
- System --> Processor --> Enable
PAE/NX
- System --> Motherboard --> Boot
Order:
- 1st device: Optical. Enabled (checked)
- 2nd device: Hard Disk. Enabled (checked)
- 3rd device: Network. Disabled (unchecked)
- 4th device: Floppy. Disabled (unchecked)
- Audio --> Disable Audio
- Network:
- Enable Network Adapter.
- Attached to: NAT
- Storage:
- 1st step: Storage Devices -->
Controller IDE --> Select Empty
- 2nd step: Attributes --> Click on the
small DVD icon --> Select "Choose Virtual Optical
Disk File..." --> Find and Select debian-12.1.0-amd64-DVD-1.iso
- USB:
- Enable USB Controller
- USB 3.0 (xHCI) Controller (only available
if you have previously installed VirtualBox Extension pack)
4- Start your newly created
virtual machine.
5- Select Graphical install
6- Select a language: English.
7- Select your
location: Other --> Europe --> Andorra
or Spain.
8- Configure locales: United
States - en_US.UTF-8.
9- Keymap to use: Catalan
or Spanish
10- Configure the
network:
- Hostname: uf1-xxyyzz,
where xx=two first letters of your name, yy=two
first letters of your first surname and zz=two first letters of your second surname (For
instance, the hostname for somebody called Jaume Pons
Martínez would be inf1-japoma).
- Domain name: fjeclot.net.
11- Set up users and passwords:
- Root password: fjeclot
- Full name for the new user:
Write xxyyzz, where xx=two
first letters of your name, yy=two first letters of
your first surname and zz=two first letters of your second surname (For instance, the
username for somebody called Enric Pons Giménez
would be enpogi).
- Username for your account: Write xxyyzz,
where xx=two first letters of your name, yy=two
first letters of your first surname and zz=two first letters of
your second surname (For instance,
the username for somebody called Enric
Pons Giménez would be enpogi).
- Password for the new user: clotfje
12-
Partition disks --> Guided-use entire disk
13- Select SCSI1 (0,0,0) (sda) - 21.5 GB ATA VBOX
HARDDISK (Don't worry if the number showed by the system is
not 1).
14- Select All files in one partition (recommended for
new users).
15- Select Finish
partitioning and write changes to disk.
16- Answer Yes to the question Write the
changes to disk?
17- Now, the base system will be installed
in your host. It takes a few minutes to complete this task. Take
it easy!!!.
18- Configure the package
manager --> Answer No to the question Scan extra
installation media?
19- Configure
the package manager --> Answer
Yes to the question Use a network mirror?
and select the following mirror: United
States --> deb.debian.org.
20- HTTP proxy
information: None (blank). Do not write anything.
21- Now, your
package manager (a software required to download and install
programs on Debian GNU/Linux) will be configured. Afterwards, a
first group of important software packages will be downloaded from
the server and installed in your computer. It takes a few minutes to complete
this task. Take it easy!!!.
22- Answer No to the question made by the
system in the window Configuring popularity-conquest.
23- In Software
selection select :
- Debian desktop
environment
- ...GNOME
- ...MATE
- web server
- SSH server
- Standard system utilities
Now,
part of the selected software will be downloaded and installed.
It could take a few minutes to complete this task (it depends on
your internet connection and features of your laptop). Take it easy!!!.
24- Select gdm3 as a default display manager. Now,
the rest of the selected software will be downloaded
and installed. It could take several minutes to complete
this task. Take it easy!!!.
25- Answer Yes to the question Install
the GRUB boot loader to your primary drive?.
26- Select /dev/sda at the next section.
27- Now, the installation is complete.
Reboot your system. Afterwards:
- Select the first option in
the GRUB menu (*Debian GNU/Linux).
- Click on the gear icon at the bottom right corner
- Select MATE as your desktop.
- Select your
username.
- Write your password
and press Enter
If everything works
properly, the selected desktop appears.
28- Check your Internet connection: Select Applications --> Internet
--> Firefox and surf
the net with Firefox.
29- Power off your system in the right way. Select System --> Shut Down
--> Shut Down.
2-
INSTALLING VIRTUALBOX GUEST ADDITIONS ON DEBIAN GNU/Linux
12.1.0
0- Before starting ->
What are VirtuaThelBox Guest Additions?
-
The Guest Additions are designed to be
installed inside a
virtual machine after the guest operating system has been
installed. They consist of device drivers and system
applications that optimize the guest operating system for
better performance and usability.
-
The Guest Additions offer the
following features:
- Mouse pointer integration
- Shared folders
- Better video support
- Time synchronization with the host
machine
- Shared clipboard
- Also provide: Seamless windows, Generic
host/guest communication channels and Automated logins
1- Boot your virtual computer: Select debian12.1
and press Start.
2- Open a terminal: Select Applications
--> System Tools --> MATE Terminal.
3- Become the root user running su -
. Write the root user password.
4- Gain access to the directory /etc/apt running
on your terminal: cd /etc/apt
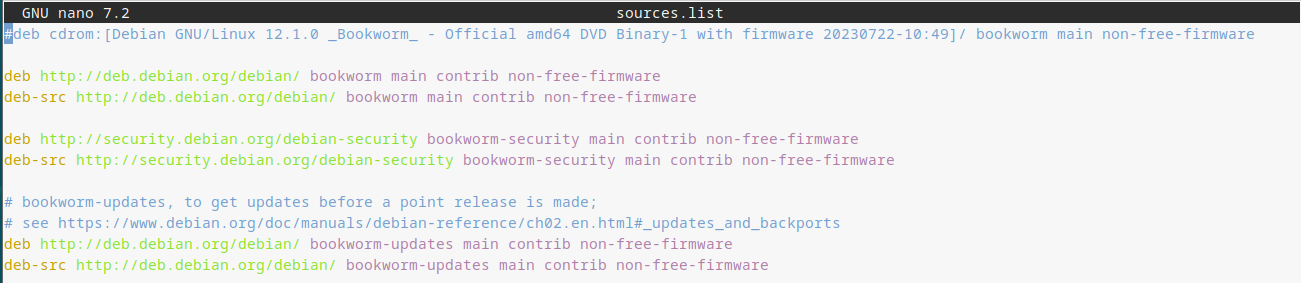
5- With the help of the nano text editor we are
going to change a file called sources.list:
- Run on your terminal: nano sources.list
- Add # before any
line starting with deb cdrom.
- Save sources.list
(press <ctrl + o> and <enter>).
- Leave the nano
text editor (press <ctrl + x>)
6- Update the list of
sofware packages available of you repository server. Run on
your terminal: apt-get update
7- Install the command line package manager called aptitude.
Run on your terminal: apt-get install aptitude
8- Install the
following software packages: gcc, make,build-essential,
dkms, module-assistant and
linux-headers-5.10.0-18-amd64. Run on your
terminal:
aptitude install gcc make
build-essential dkms module-assistant
linux-headers-6.1.0-11-amd64
It takes a few minutes to complete this task.Take it easy!!!.
9- Select the Devices menu --> Insert Guest
Additions CD image and:
- If a new window
automatically appears where you can select among several
options, select Do Nothing.
- If nothing appears,
run the following command: mount /dev/cdrom /media/cdrom0
10- Run the command:
/bin/bash
/media/cdrom0/VBoxLinuxAdditions.run
11- Close the MATE Terminal.
12- Shutdown your system in the right way.: Select
System --> Shut Down --> Shutdown.
13-
Eject the VBoxGuestAdditions.iso
cdrom image:
- 1st step: Storage Devices -->
Controller IDE --> Select VBoxGuestAdditions.iso
- 2nd step: Attributes --> Click on the
small DVD icon --> Select Remove Disk from
VirtualDrive
13- Boot
(Start) Debian GNU/Linux. Gain access to
your Desktop.
14- Resize
your window and your Desktop with the help of your mouse.
15- Power off your system in the right
way. Select System --> Shut
Down --> Shut Down.
3- ADD NEW
REPOSITORIES TO YOUR PACKAGE MANAGER
0- Before starting:
- A software package contains all
of the files required to install or unistall programs on
Debian GNU/Linux
-
A package
manager keeps track of what software is
installed on your computer, and allows you to easily
install new software, upgrade software to newer versions,
or remove software that you previously installed.
The job of a package manager is to present an interface
which assists the user in managing the collection of
packages installed on his or her system.
- A software repository is a
storage location for software packages. An external hard
drive, a DVD/CDROM or a Shared Folder in a computer
(repository server) in the LAN or Internet could be a
software repository. Debian GNU/Linux have many
mirrors (an image or clone of a main repository server)
around the world. Usually, a computer downloads software
packages from a software repository with the help of package
manager. The package manager will install the software
package in the systeme as well.
- aptitude is a package
manager and it reads the list of software repositories
or "sources" from the file /etc/apt/source.list.
1- As a root
user, change /etc/apt/sources.list in order to add
the contrib and non-free repository
addresses (or sources). Adding these new
repositories allows the system to gain access to
some extra useful software packages. The new sources.list
file should have the following contents:
After changing the contents of
/etc/apt/sources.list, run: aptitude update
2- Install a useful GUI text editor
called Geany on your system. Just follow the
next steps as a root user: aptitude
install geany
3- Install the arial font (and another
useful fonts). Run: aptitude install
ttf-mscorefonts-installer
It takes a few minutes to complete this task.Take it
easy!!!.
4- Install
MATE Tweak. Run: aptitude install
mate-tweak
4- Logout as root.
Run: exit
5-
Show the Trash bin and Computer icons
on your Desktop:
a) Select
System --> Control Center --> Look and Feel -->
MATE Tweak. Enable Trash and Computer.
b) Check that Trash bin and Computer
appear on your Desktop.
6- Start the LibreOffice
Writer text editor: Applications --> Office
--> LibreOffice Writer. Check that the
arial font is now available.
7- Install net-tools. Run: aptitude
install netstat -atupn
4- ADD YOUR USER TO SUDO GROUP
1- Start
a terminal (MATE Terminal)
and using the su -
command,
become the root
user.
2-
Add your user to sudo
group. Run: gpassswd -a
xxyyzz vboxsf
where xxyyzz
is the user created by you
during the installation process
of Debian GNU/Linux.
3- Log out as root.
Afterward, Close
the terminal
window
properly
and log
out as
standard user
from your
desktop.
Finally, gain
access to your
desktop again.
5-
ATTACH A physical USB DRIVE TO DEBIAN GNU/Linux
1- Start a terminal
(MATE Terminal) and using the su
- command, become the root
user.
2- Provide your user with
the proper permissions to work
with shared folders by running
the command:
gpasswd
-a xxyyzz vboxsf
where xxyyzz
is the user created by you
during the installation process
of Debian GNU/Linux.
3- Log out as root.
Afterward, Close
the terminal
window
properly
and log
out as
standard user
from your
desktop.
Finally, gain
access to your
desktop again.
4- Plug your USB
drive into your laptop.
5-
Attach and open a USB
drive into your virtual
machine:
Click on the "USB
settings.." icon
at
the bottom right corner of
your virtual machine and
select your USB drive.
Automatically a folder
showing the contents of your
USB drive will appear.
6-
SHARING FOLDERS BETWEEN THE HOST (PHYSICAL)
MACHINE AND THE VIRTUAL MACHINE
1- Shutdown your
virtual
computer.
2- Create
a new folder,
called sharing,
inside the
folder VirtualBox
VMs of
your host
operating
system. Create
a new empty
file called inf1_xxyyzz.txt
inside the
folder sharing
of
your host
operating
system.
Remember: xx=two
first letters
of your name,
yy=two
first letters
of your first
surname and
zz=two
first letters
of your second
surname.
3-
On VirtualBox
Manager,
select your
virtual
machine and,
afterwards,
select Shared
folders.
4- Select
Machine
Folders
and click on
the small blue
rectangle with
a green cross
at the right
side of the
window. A
window will
appear with a
form to add a
new shared
folder. Add a
new one with
the following
features:
a)
Folder Path:
Look for sharing
on your
system and
select it.
b)
Folder Name
--> sharing
c)
Select
Auto-mount
d) Mount
point --> Do
no write
anything
5- Boot
your virtual
machine.
6-
Select
and open the sf_sharing
folder on your
Desktop. Check
that the file
inf1_xxyyzz.txt
created in
step 2
appears. Copy
the file on
the Desktop of
your virtual
machine.